
Ushahidi Quick Start
This guide describes how to get Ushahidi up and running.
Getting Ushahidi Up and Running
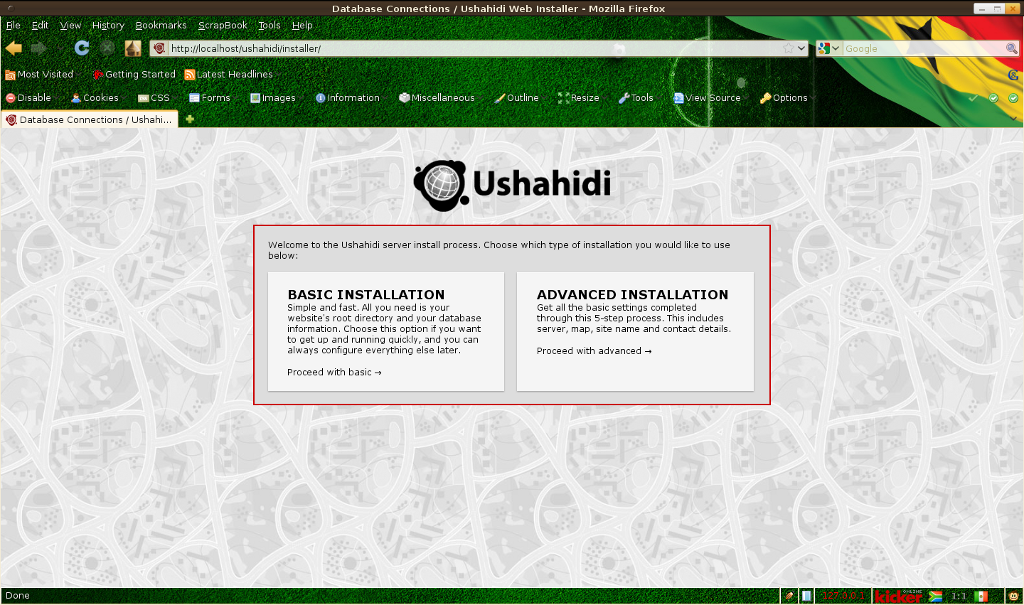
- Starting Ushahidi via the desktop icon or menu item opens the web
browser and brings you to the Installation page. A Ushahidi site is
pretty easy to set up
- Choose “Basic Installation”, “Let’s get started”, and it will prompt
you for a few details. The database name is “ushahidi”, database user
name is “user”, the password is also “user”. The database host is
“localhost”. Then continue. In the General setup page choose a
site name (title) for your website such as OSGeo demo and if you like
a tag-line subheading as well. The email address it asks you for is used
for receiving automatic submissions which it will process and add to the
database and maps, and send automated reports from. For now set it to
something like “ushahidi@localhost.localdomain” or “ushahidi@example.org” and “Continue”.
Note
If Ushahidi complains about this “Oops! We couldn’t make a
connection to the database server with the credentials given. Please make
sure they are correct.”. This means the installer script couldn’t create
the database credentials. This has to be done manually before you can continue
with the installation. Issue the following commands assuming you have
logged into the system as root:
“mysql -uroot -p” – This should prompt you for mysql server’s root
password. Enter the root password if there is one, otherwise hit the enter key.
Then enter the command below to create a new user.
“CREATE DATABASE ushahidi;” – This should create a database called ushahidi
Followed by this command.
“GRANT ALL PRIVILEGES ON ushahidi.* TO ‘user’@’localhost’ IDENTIFIED BY ‘user’;”
– This should create a username “user” and a password “user”
Now go back to the Ushahidi web installer step 2 and fill in the details.
- If will then ask you for login email and password. Set the email address to
“admin@example.org” and the password as “admin” (enter it twice).
After that is all done it should tell you that installation was
successful and give you a link to ‘View your website’.
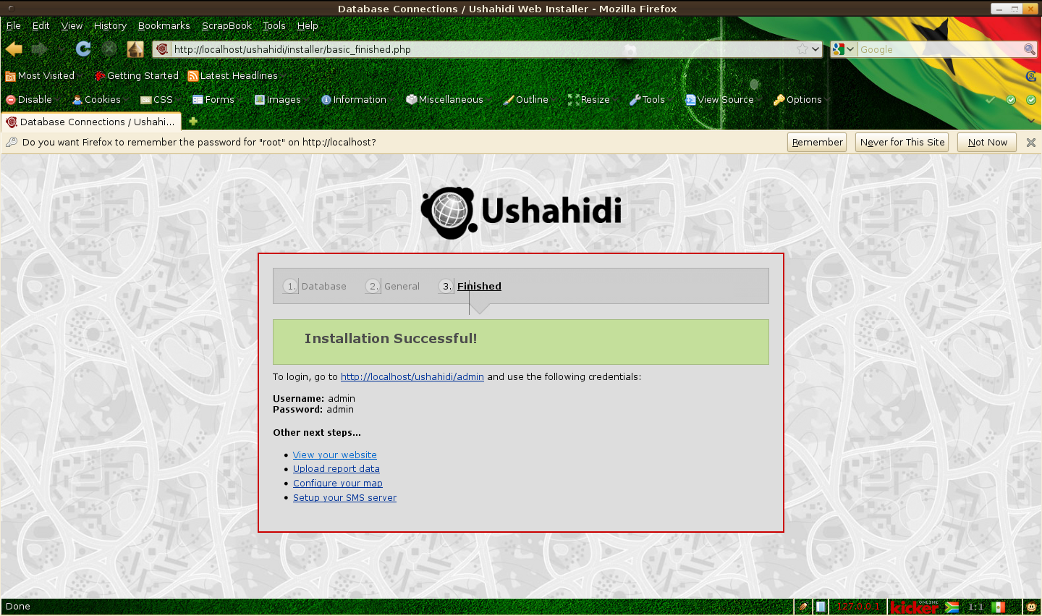
- To make changes in the administration area,
the login username and password are as you entered above, “admin@example.org”
and “admin”.
In the setup page you might want to select “Settings”
(top right) and then the “Map” tab, and change the
“Map provider” to OpenStreetMaps Cycling Map (no API key
necessary for OSM, as it’s Open :-) ). Then click the SAVE SETTINGS
button at the bottom of the page.

The setup up README page is available locally in
the /var/www/ushahidi/README.markdown file.
