
GeoExt Quickstart
GeoExt is a JavaScript library that runs in the browser, it combines and enhances the ExtJS framework and OpenLayers library. This quick start details the steps to create a rich web application using GeoExt components in less than 200 lines of code. We will be using the installed MapServer web services on OSGeoLive a MapServer to supply map layers to the application. Completing the steps below will result in the demo GeoExt application at http://localhost/geoext/.
HTML Page
In this step we will set-up an empty HTML page which will contain the application.
First create a new HTML file at /var/www/html/geoext/demo.html using the text editor Leafpad installed on OSGeoLive. To
ensure you have permissions to save the file open Leafpad from the command line with elevated permissions using the
command below:
sudo leafpad
Next paste in the HTML below. This contains links to the ExtJS and OpenLayers JavaScript libraries, and two CSS files used to style ExtJS and OpenLayers components.
We will use the Ext.Loader class to load in GeoExt JavaScript source files. These are all in the src folder
in /var/www/html/geoext/.
<!DOCTYPE html>
<html>
<head>
    <meta charset="utf-8" />
    <title>OSGeoLive | GeoExt QuickStart</title>
    <link rel="stylesheet" href="resources/theme-triton-all.css" type="text/css" />
    <link rel="stylesheet" href="ol.css" type="text/css" />
    <script src="ext-all.js"></script>
    <script src="ol.js"></script>
</head>
<body>
    <script>

       Ext.Loader.setConfig({
           enabled: true,
           paths: {
               'GeoExt': 'src/'
           }
       });

        Ext.onReady(function () {
            // all JavaScript application code should go here
        });
    </script>
</body>
</html>
You should now be able to view an empty HTML page in Firefox at http://localhost/geoext/demo.html
All the JavaScript in the following sections should be pasted after the // all JavaScript application code should go here comment in the
Ext.onReady function. Placing code here ensures the JavaScript libraries have been loaded before running any custom JavaScript code.
OpenLayers
Next we will configure some OpenLayers objects used by the application. First lets create a map tile layer using OpenStreetMap, and some WMS layers that are available from the MapServer Itasca demo on OSGeoLive.
var map;
var mapServerUrl = 'http://localhost/cgi-bin/mapserv?map=/usr/local/www/docs_maps/mapserver_demos/itasca/itasca.map&';

var osmLayer = new ol.layer.Tile({
    source: new ol.source.OSM(),
    name: 'OpenStreetMap'
});

var wmsLayer1 = new ol.layer.Image({
    source: new ol.source.ImageWMS({
        url: mapServerUrl,
        params: { 'LAYERS': 'ctybdpy2' }
    }),
    name: 'County Boundary'
});

var wmsLayer2 = new ol.layer.Image({
    source: new ol.source.ImageWMS({
        url: mapServerUrl,
        params: { 'LAYERS': 'lakespy2' }
    }),
    name: 'Lakes & Rivers'
});

var wmsLayer3 = new ol.layer.Image({
    source: new ol.source.ImageWMS({
        url: mapServerUrl,
        params: { 'LAYERS': 'majrdln3,majrdln3_anno' }
    }),
    name: 'Highways'
});
Next we are going to add in a WFS vector layer - this is a little more complicated, but follows the same approach of creating a source and then a layer as the previous layers:
var vectorSource = new ol.source.Vector({
    format: new ol.format.GeoJSON(),
    url: function (extent) {
        return mapServerUrl + 'service=WFS&' +
            'version=1.1.0&request=GetFeature&typename=airports&' +
            'outputFormat=application/json&srsname=EPSG:3857&' +
            'bbox=' + extent.join(',') + ',EPSG:3857';
    },
    strategy: ol.loadingstrategy.bbox
});

var vectorLayer = new ol.layer.Vector({
    source: vectorSource,
    name: 'Airports'
});
Now we are going to create our OpenLayers map object configured with the layers we just created. We will also set the center and zoom level of the map, and add in a select interaction so we can select features in our vector layer.
var map = new ol.Map({
    layers: [
        wmsLayer1, wmsLayer2, wmsLayer3, vectorLayer
    ],
    view: new ol.View({
        center: ol.proj.fromLonLat([-93.33, 47.32]),
        zoom: 6
    })
});

var selectInteraction = new ol.interaction.Select();
map.addInteraction(selectInteraction);
GeoExt
Now the map and layers have been configured we are going to create and configure our GeoExt components. First of all we will create a GeoExt.component.Map. This uses the
OpenLayers map we created, and will be positioned in the ‘center’ region of our application.
var mapComponent = Ext.create('GeoExt.component.Map', {
    map: map,
    region: 'center'
});
Next we will create a layer tree component. The tree has its own data store - GeoExt.data.store.LayersTree, which we will fill with layers from our OpenLayers
map. The store will then be used to populate our tree panel. We will also add in a plugin to the tree to allow the map layer order
to be changed by dragging and dropping the layers. The flex property causes the tree panel to fill up all available space in its
region of the screen.
var treeStore = Ext.create('GeoExt.data.store.LayersTree', {
    layerGroup: map.getLayerGroup()
});

var layerTreePanel = Ext.create('Ext.tree.Panel', {
    title: 'Map Layers',
    width: 300,
    flex: 1,
    store: treeStore,
    rootVisible: false,
    viewConfig: {
        plugins: { ptype: 'treeviewdragdrop' }
    }
});
We are also going to create a grid component to display the attributes of features in our WFS layer. Similar to the layer tree store and
tree panel, we create a GeoExt.data.store.Features store and a grid panel.
var featureStore = Ext.create('GeoExt.data.store.Features', {
    layer: vectorLayer,
    map: map
});

var featureGrid = Ext.create('Ext.grid.Panel', {
    store: featureStore,
    region: 'south',
    title: 'Airport Runways for Itasca County',
    columns: [
        { text: 'Name', dataIndex: 'NAME', flex: 3 },
        { text: 'Quadrant', dataIndex: 'QUADNAME', flex: 1 },
        { text: 'Elevation', dataIndex: 'ELEVATION', flex: 1 }
    ],
    listeners: {
        selectionchange: function (sm, selected) {
            Ext.each(selected, function (rec) {
                selectInteraction.getFeatures().clear();
                selectInteraction.getFeatures().push(rec.getFeature());
            });
        }
    },
    height: 300
});
Our final GeoExt component is an overview map - GeoExt.component.OverviewMap. We will configure this to display the OpenStreetMap layer we created earlier, and
place it in an ExtJS panel.
var overview = Ext.create('GeoExt.component.OverviewMap', {
    parentMap: map,
    layers: [osmLayer]
});

var overviewPanel = Ext.create('Ext.panel.Panel', {
    title: 'Overview',
    layout: 'fit',
    items: overview,
    height: 300,
    width: 300,
    collapsible: true
});
ExtJS
The final step in creating our application is to create a viewport - a container representing the application which will display all the components we created above.
var vp = Ext.create('Ext.container.Viewport', {
    layout: 'border',
    items: [
        mapComponent,
        {
            xtype: 'container',
            region: 'west',
            layout: 'vbox',
            collapsible: true,
            items: [
                overviewPanel,
                layerTreePanel
            ]
        },
        featureGrid
    ]
});
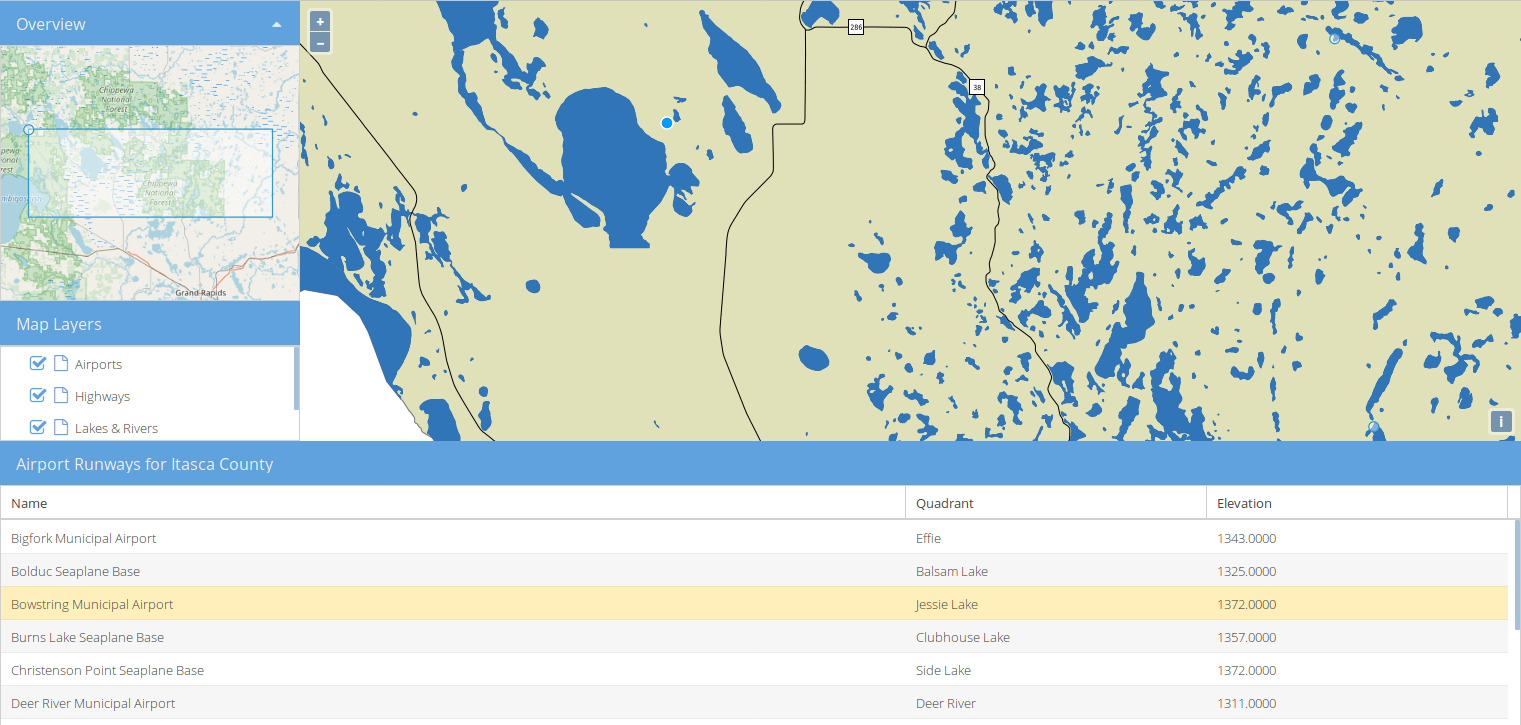
You should now be able to refresh the link http://localhost/geoext/demo.html in your browser and see a complete GeoExt application similar to the image below.
What’s Next?
- The GeoExt homepage contains full API documentation and examples
- A GeoExt workshop details all the steps for configuring and using GeoExt3 in your ExtJS applications
- The OpenLayers v4.6.5 API docs
- The ExtJS 6.2.0 API docs