Kosmo - Desktop is a user friendly, desktop GIS application which allows you to explore, edit and analyse spatial data from a variety of databases, vector and raster formats.
This Quick Start describes how to:
In order to start the application, follow the next steps:
From the start menu, select Other > Kosmo (or from the desktop, go into Desktop GIS folder and double-click the Kosmo icon)
The application will take a few seconds to start (a splash screen is shown while loading)
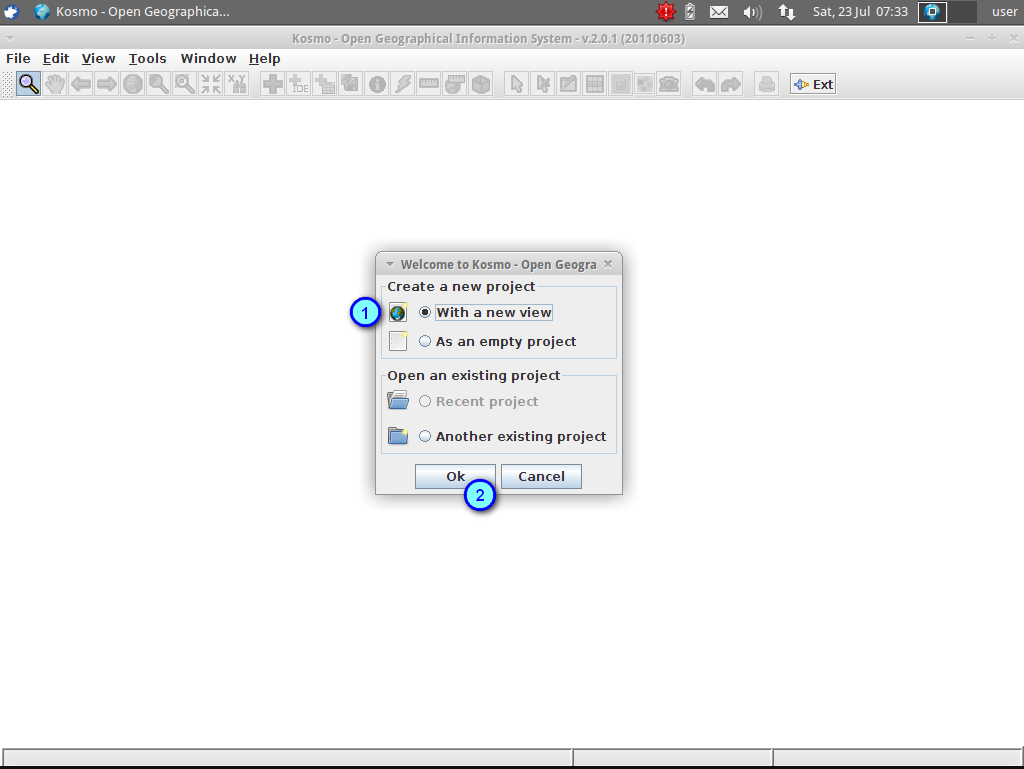
In the Welcome dialog, select the option Create a new project > With a new view (1) and press the Ok button (2)
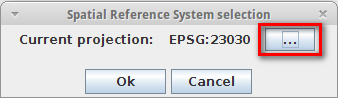
In the Spatial Reference System selection dialog, press the ... button
Select the option EPSG in the SRS type combobox (1), insert the text 4236 in the text field and press the Search button (2)
Select the SRS EPSG:4326 - WSG4 (3) and press the Ok button (4)

Press the Ok button again to select the SRS loaded. The view will start with EPSG:4326 as the base projection
Tip
You can see which projection has been selected as base for a specific view in the view window title bar, right to the view name
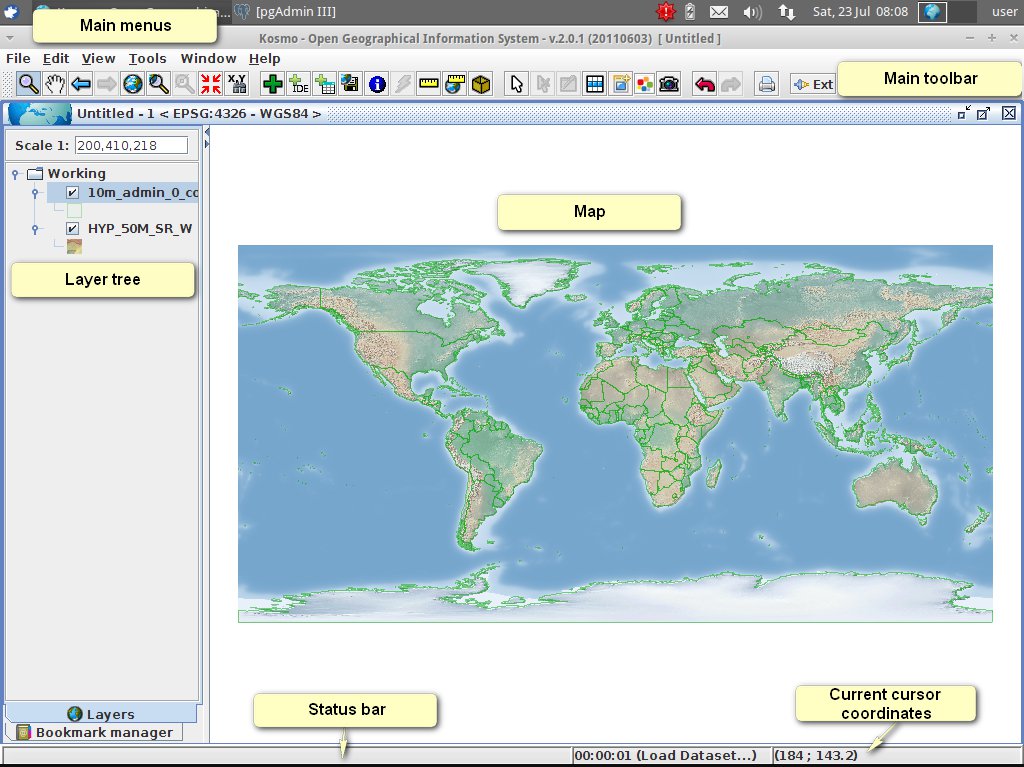
The Kosmo Desktop main window has the following sections:
Main menus
Main toolbar
Layer tree
Tree that contains the categories and layers that have been loaded in the current view.
Map
Status bar
Shows the application warning messages to the user.
Current cursor coordinates
To start out, we’re going to load some of the sample data included on the LiveDVD:
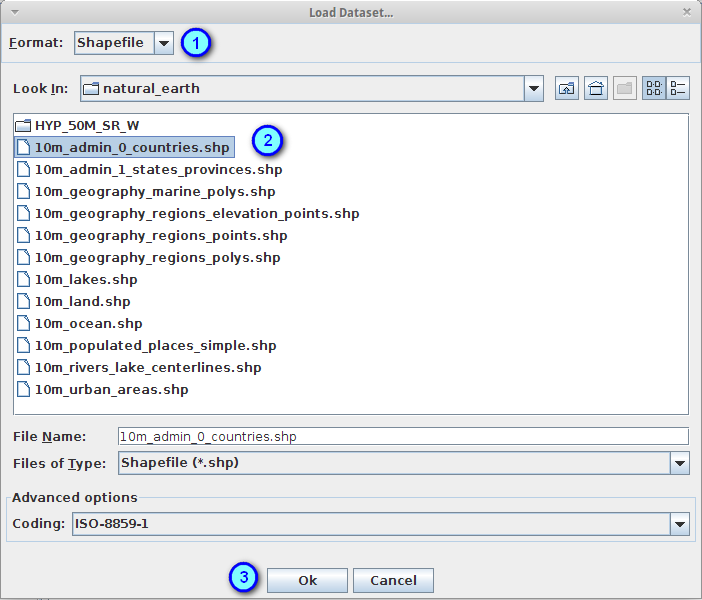
Choose the option View > Load Dataset... or push the button with the green plus from the main toolbar
In the Format combobox, select Shapefile (1)
In the file chooser, select the file 10m_admin_0_countries.shp from the directory /usr/local/share/data/natural_earth (2)
Press the Ok button to load the selected shapefile (3)
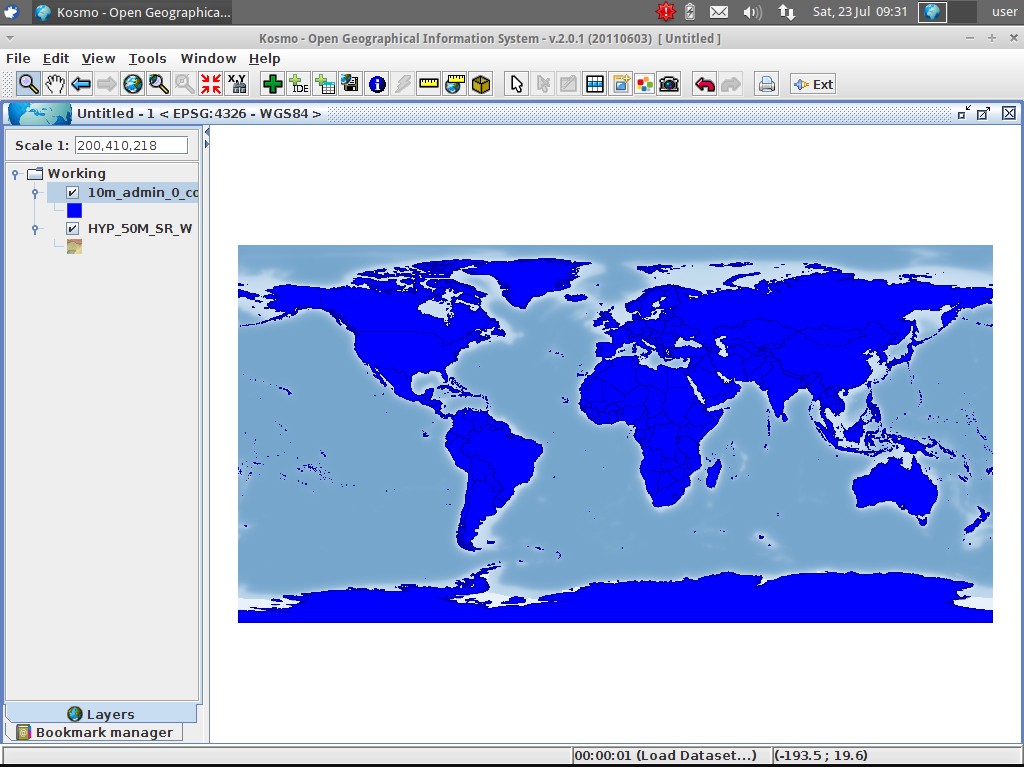
In the layer tree, press the visibility checkbox to make the layer visible
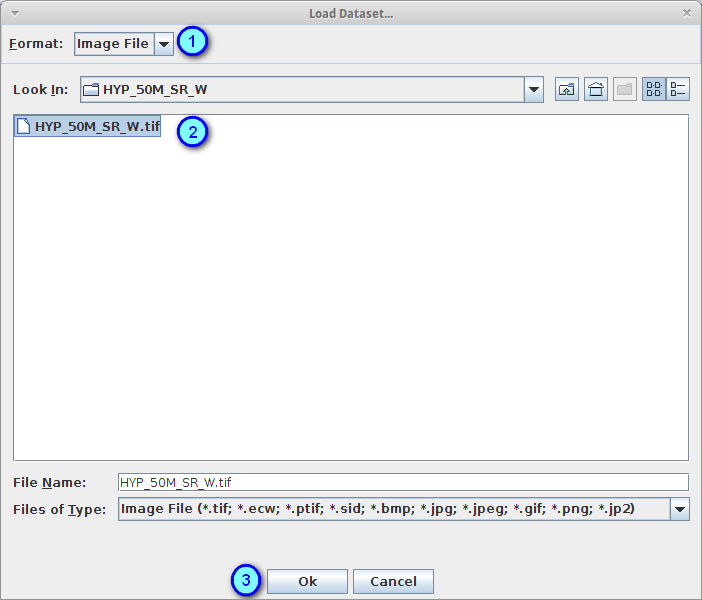
Choose again the option View > Load Dataset... or push the button with the green plus from the main toolbar
In the Format combobox, select Image file (1)
In the file chooser, select the file HYP_50M_SR_W.tif from the directory /usr/local/share/data/natural_earth/HYP_50M_SR_W (2)
Press the Ok button to load the selected image file (3)
In the layer tree, press the visibility checkbox to make the layer visible
You can see that the layer drawing order is from bottom to top in the layer tree: modify the layer order by dragging them in order to show them properly
Note
The LiveDVD contains some file data examples in the following directories:
You can try to load more examples from those directories. Remember to select the correct format from the Format combobox
Tip
It’s possible to add all the images from a directory as an unique layer by selecting the parent directory in the Load Dataset... dialog: Kosmo Desktop will load them as a mosaic.
We’re going to load a database table as an example:
Choose the option View > Load Dataset... or push the button with the green plus from the main toolbar
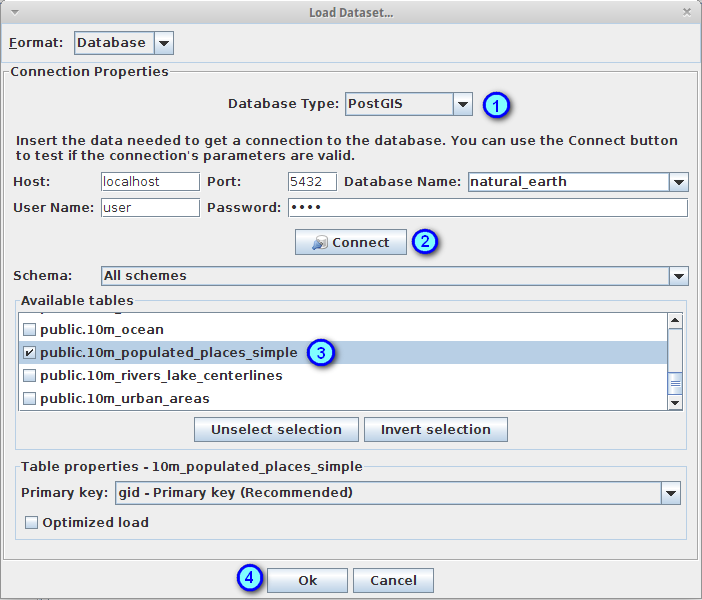
In the Format combobox, select Database (1)
Fill the fields host, port, database name, user name and password with the values:
Press the Connect button to load the tables present at the natural_earth database (2)
Select the checkbox corresponding to the table 10m_populated_places_simple (3)
Press the Ok button to load the selected database table (4)
In the layer tree, press the visibility checkbox to make the layer visible
Start the GeoServer WMS included in the LiveDVD by selecting the option Geospatial ‣ Web Services ‣ GeoServer ‣ Start GeoServer (or from the desktop, go into Web Services folder and double-click the Start Geoserver icon)
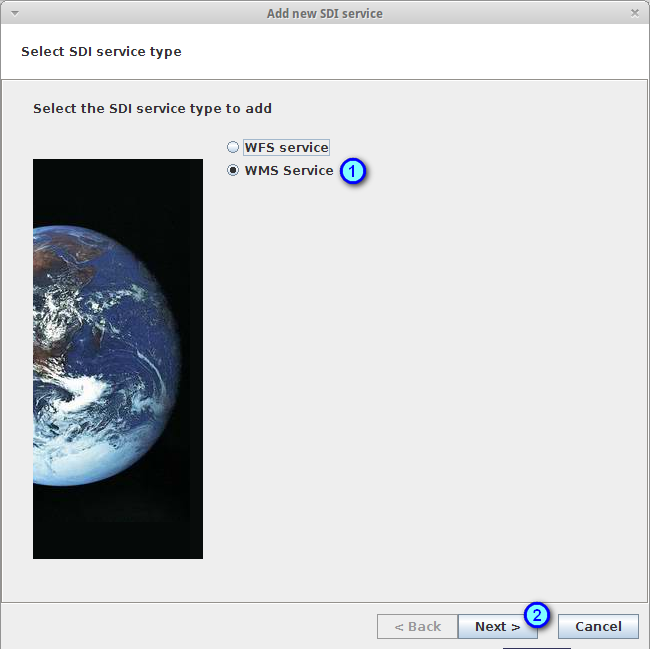
Press the Load SDI Service button at the main toolbar to open the wizard
In the Select SDI service type panel, select the option WMS Service (1) and press the Next button (2)
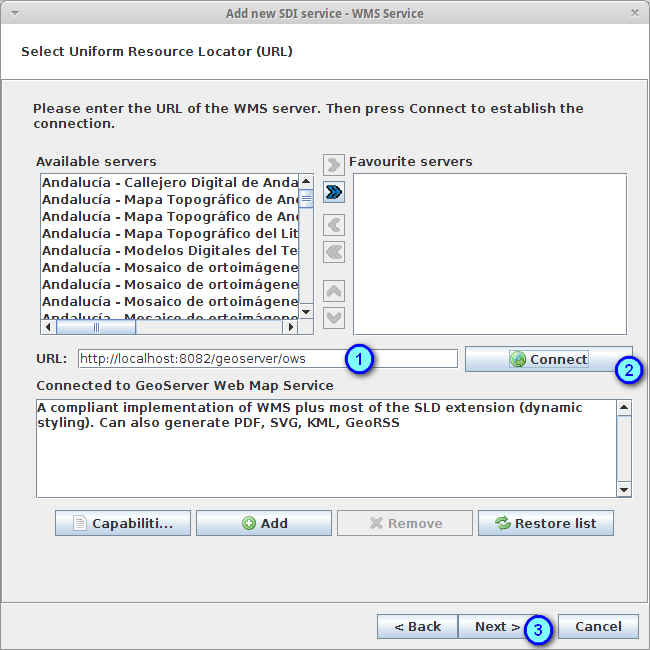
In the Select Uniform Resource Locator (URL), type the URL http://localhost:8082/geoserver/ows?VERSION=1.1.1 (1) in the corresponding text field and press the Connect button (2)
If the connection is successful, press the Next button to go to the next panel (3)
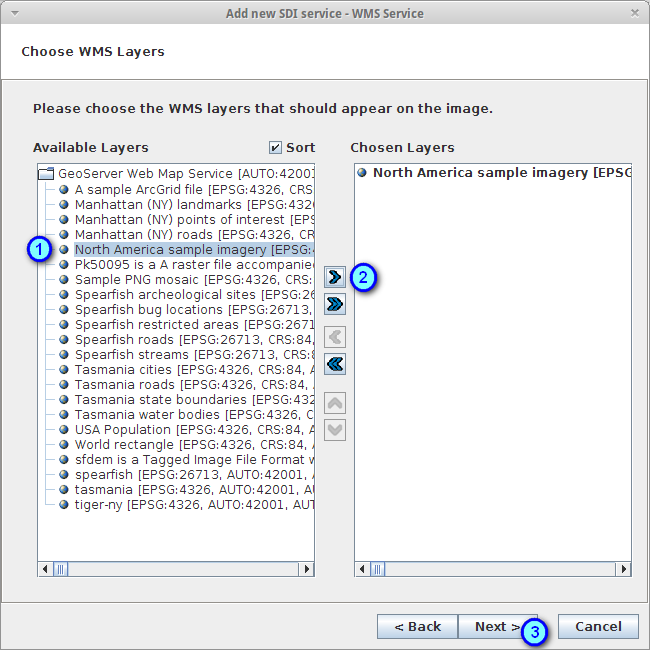
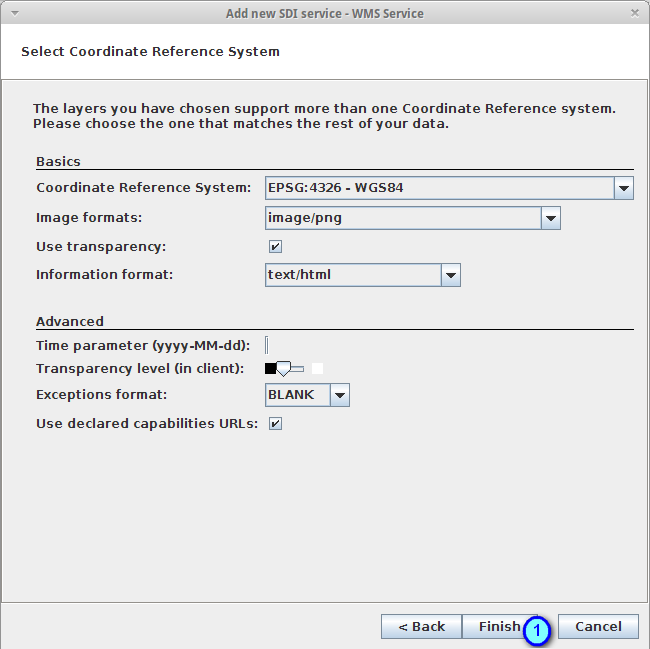
Select the layer North America Sample Imagery (1) and press the > button (2) to move it to the right list. Press Next button. (3)
Leave the default options loaded and press the Finish button (1) to start the layer loading
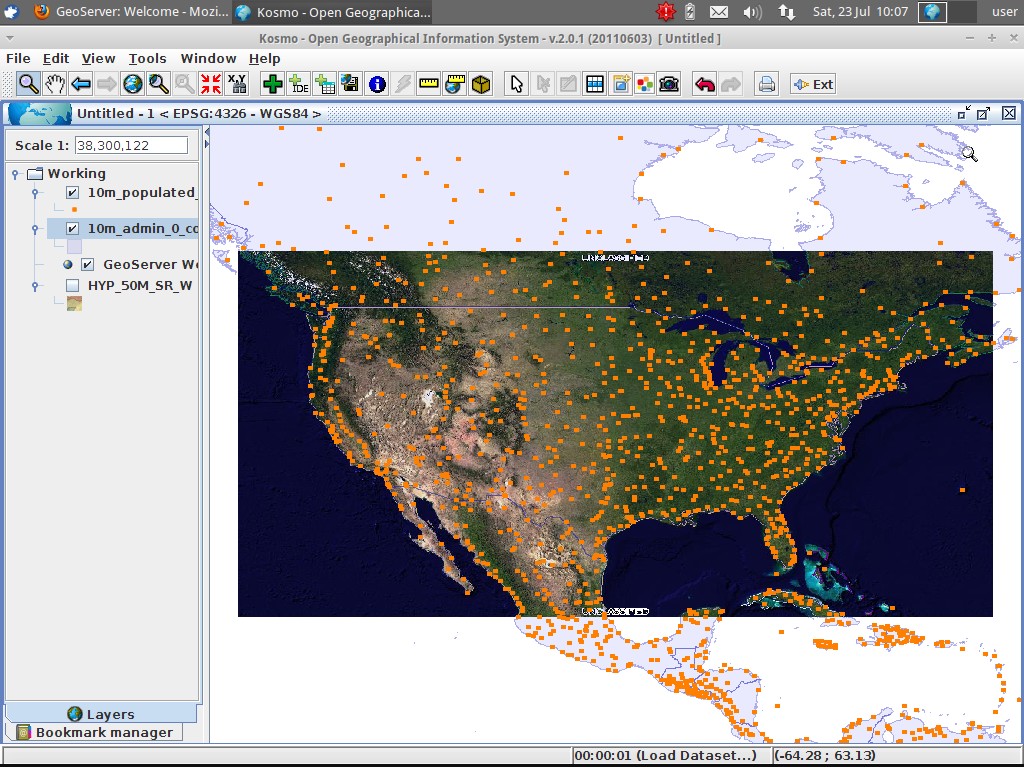
In the layer tree, press the visibility checkbox to make the layer visible
Select the layer in the layer tree and press the Zoom To Layer button to center the map in the WMS layer view
Reorder the layer tree by dragging the new layer and put it over the HYP_50M_SR_W raster layer
Note
Kosmo Desktop contains a list of WMS servers by default (most of them are from Spain). If you’re connected to internet, you can use them as described in the example with the local server.
You can control where in the world is the map using the navigation tools present at the main toolbar:
 Zoom In/Out
- It’s the tool selected by default when you start your session
- Use the mouse left button to zoom in a fixed ammount at the clicked map point
- Use the mouse right button to zoom out a fixed amount at the clicked map point
- Press the mouse left button, move the mouse, draw a rectangle and release the button if you want to zoom to that rectangle
 Pan
Pan
- Allows to move around the world without changing the scale
- Press the mouse left button, move the mouse and release it in order to move the map to the desired location
 Zoom Previous
- Allows to zoom to the previous viewing envelope from the zoom history (if available)
 Zoom Next
- Allows to zoom to the next viewing envelope from the zoom history (if available)
 Zoom To Full Extent
- Allows to change the current map envelope to include all the visible layers
 Zoom To Layer
- Allows to change the current map envelope to adjust to the selected layer
 Zoom To Selected Items
- Allows to change the current map envelope to adjust to the selected features
 Pan To Click
- Centers the map in the clicked map point, without changing the current scale
 Coordinate Localization
- Centers the map in the given X - Y coordinates
Apart from those tools, it’s also available the possibility to zoom in/out by using the mouse wheel.
Note
If any tool/menu option is disabled, you can place the cursor over the button/option to see a tooltip where the reason is shown
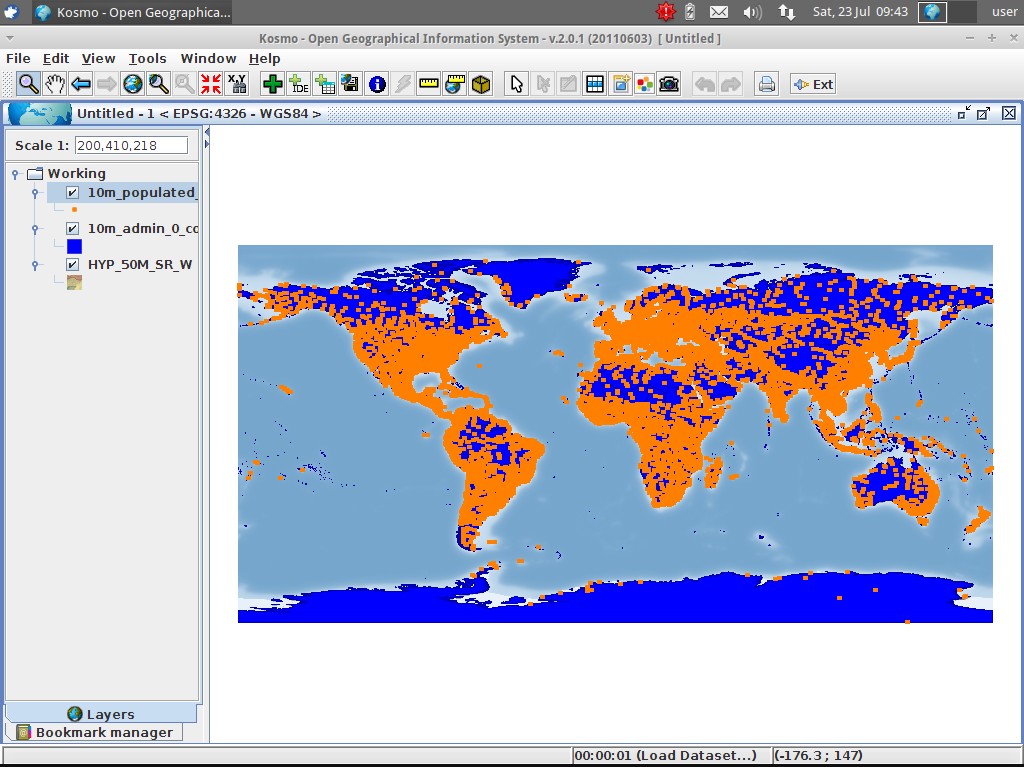
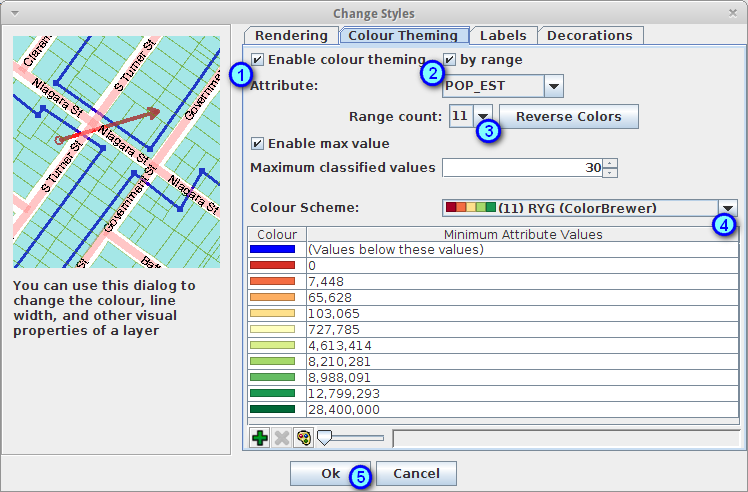
In this section we’re going to style a layer by range using the country population as styling attribute:
Select the layer 10m_admin_0_countries in the layer tree
Right click on it and select the option Simbology > Change Styles...
Click on the tab Colour theming
Activate the options Enable colour theming and by range (1)
Select POP_CNTRY as Attribute (2), 8 as Range count (3) and RYG (Color Brewer) as Color schema (4)
Press the Ok button to apply the changes (5)
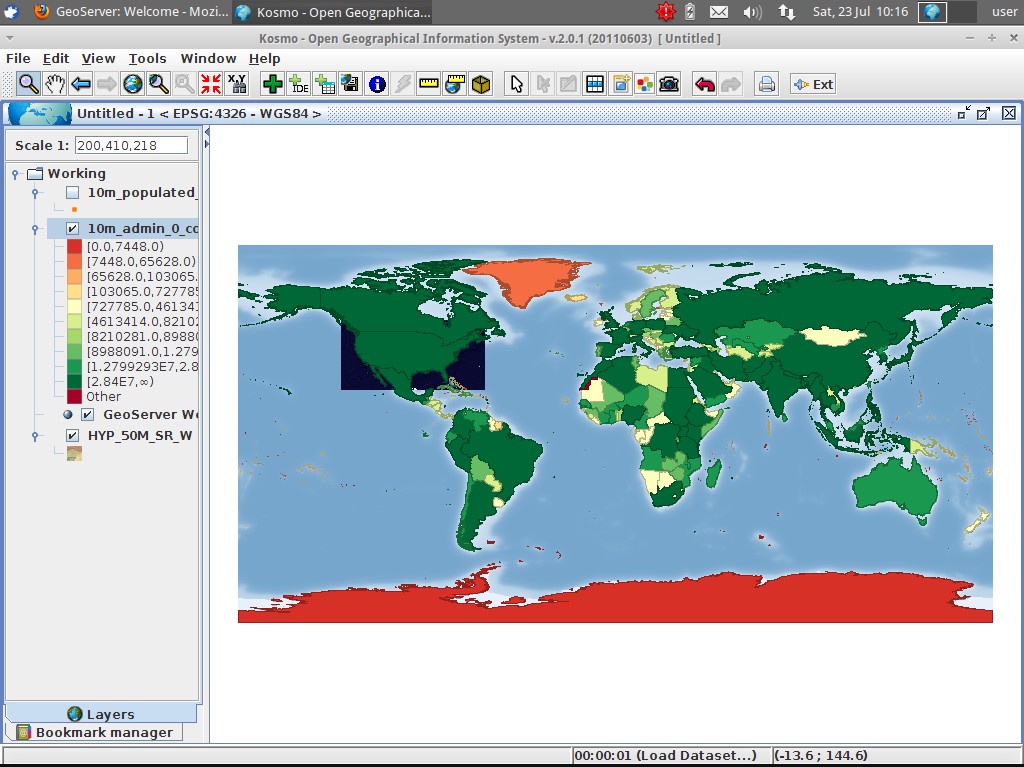
The layer will change its style to reflect the changes:
There is a set of manuals and videotutorials available at http://www.opengis.es/index.php?lang=en