project logo

QGIS Quickstart

Quantum GIS (QGIS) is a user friendly Desktop GIS client which lets you visualize, manage, edit, analyse data and compose printable maps.

This Quick Start describes how to:

  • update an existing QGIS project
  • create a new QGIS project with a simple vector layer

Edit QGIS project

  1. Click Desktop ‣ Desktop GIS ‣ Quantum GIS.

  2. Choose File ‣ Open Project... from the menu bar.

  3. Select QGIS-NaturalEarth-Example.qgs and press Open.

    • You should see a world map.
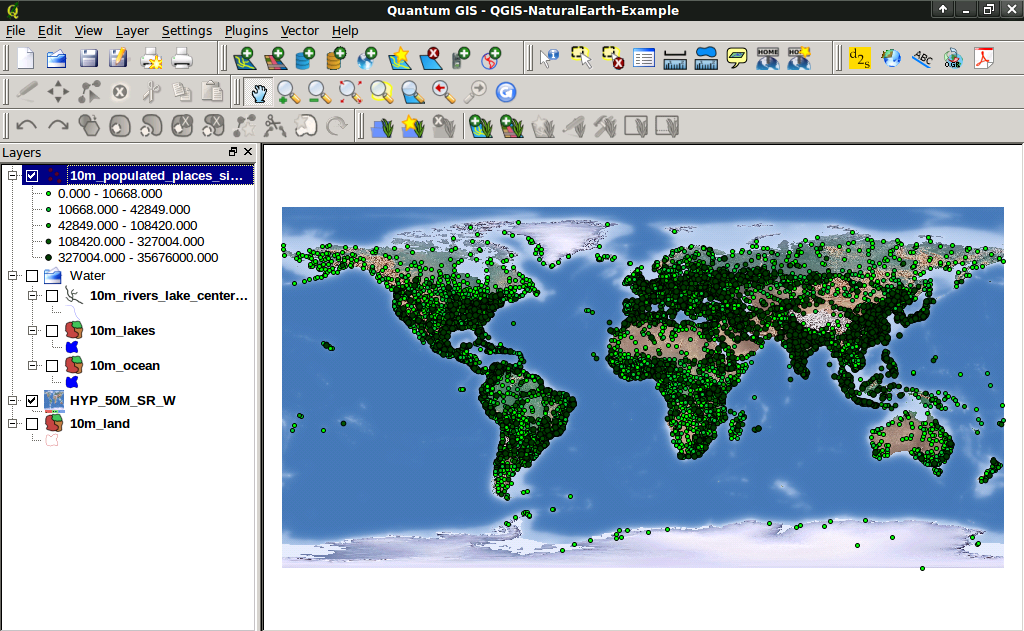
  4. Check 10m_populated_places_simple in the Layers tree

    • Populated places are now displayed:

      ../../_images/qgis.png
  5. Double click 10m_rivers_lake_centerlines in the Layers tree.

  6. Change the color in Outline Options to a different blue tone.

  7. Press OK.

    • Rivers are now rendered in a new color.

Create a new QGIS project

  1. Choose File ‣ New Project.
  2. Click Layer ‣ Add Vector Layer....
  3. Browse to dataset /home/user/data/natural_earth/10m_admin_0_countries.shp.
  4. Press Open.
    • You should see all world countries.

Connect to a PostGIS spatial database

  1. Choose File ‣ New Project.
  2. Choose Layer ‣ Add PostGIS Layers....
    • Both Natural Earth and OpenStreetMap databases will be available.
  3. With the OpenStreetMap connection selected, press Connect.
    • A list of database tables will appear.
  4. Select planet_osm_roads and click Add.

Using the GRASS Toolbox

  1. Choose File ‣ New Project.
  2. Choose Plugins ‣ Manage Plugins.
  3. Type grass into the Filter box and select the GRASS plugin. Then click Ok.
    • A new GRASS menu with in the Plugin menu and a new toolbar will appear.
  4. Choose Plugins ‣ GRASS ‣ Open mapset.
    • The GRASS GIS data base will be automatically set to ~/grassdata on the disc.
  5. Choose the nc_basic_smp Location and user1 working mapset, then click Ok.
  6. Choose Plugins ‣ GRASS ‣ Add GRASS raster layer.
    • From the PERMANENT mapset select the elevation_shade map and click Ok.
  7. Choose Plugins ‣ GRASS ‣ Add GRASS raster layer.
    • From the PERMANENT mapset select the elevation map and click Ok.
    • Double click on the elevation map in the QGIS layer list and set its transparency to 65%.
  8. Choose Plugins ‣ GRASS ‣ Add GRASS vector layer.
    • From the PERMANENT mapset select the roadsmajor map and click Ok.

You also have access to many of the powerful GRASS analysis modules.

  1. Choose Plugins ‣ GRASS ‣ Open GRASS tools.
    • A long list of analysis tools will appear.
  2. Type nviz into the Filter box then select NVIZ.
  3. In the new module tab that pops open, select the elevation map as the map for elevation, and roadsmajor for the vector overlay, then click Run.
  4. Once the NVIZ 3D view opens, maximize the window, set z-exag to 10.0, perspective to 15.0, height to 3500, and drag the positioning puck in the compass box on the left to a nice view.
  5. Choose Visualize ‣ Raster surfaces and set the fine resolution to 1.

Using the Sextante Toolbox

  1. Choose Plugins ‣ Manage Plugins.
  2. Type sextante into the Filter box and select the SEXTANTE plugin. Then click Ok.
    • A new Analysis menu and toolbar will appear.
  3. Choose Analysis ‣ Sextante Toolbox.
    • A new toolbar will open on the right side of the screen with many processing tools to choose from.

Using the OpenStreetMap plugin

  1. Open the Terminal Emulator from the Xubutu Applications ‣ Accessories menu.
    • Make a working copy of the OSM data in the home directory:
cp data/osm/feature_city_CBD.osm.bz2 .
bzip2 -d feature_city_CBD.osm.bz2
  1. In QGIS, choose File ‣ New Project.
  2. Choose Plugins ‣ Manage Plugins.
  3. Type open into the Filter box and select the OpenStreetMap plugin. Then click Ok.
    • A new Web menu and toolbar will appear.
  4. Choose Web ‣ OpenStreetMap ‣ Load OSM from file.
  5. Select the feature_city_CBD.osm file you just copied into the home directory.
  6. Tick the name, highway, and amenity check boxes.
  7. Choose Medium scale rendering, then click Ok.

What Next?

Tutorials for more advanced features of QGIS are collected as OSGeo-Live QGIS tutorials.

To learn more about QGIS, a starting point is the Documentation page on the QGIS homepage.

OSGeo-Live contains a A Gentle Introduction to GIS and the QGIS User Guide.

Copyright & Disclaimer