istSOS is sensor data management tool that allows collection, maintenance and publishing of monitoring observations using the Open Geospatial Consortium (OGC) Sensor Observation Service (SOS) standard.
This QuickStart describes how to:
- Add new observations using a python script and the RestFul API.
- View and edit data with the administration interface.
First we will create a text file with sensor data, formatted according to “text/csv, subtype=istSOS”. The file uses a Comma Separated Values (CSV) format. The first line contains header information, including URI names of the observed properties. The following lines contain the data.
- Open a text editor by selecting Accessories ‣ Leafpad.
- Copy and paste the follwing text into the text editor window:
urn:ogc:def:parameter:x-istsos:1.0:time:iso8601,urn:ogc:def:parameter:x-istsos:1.0:meteo:air:temperature
2014-06-03T14:30:00.00Z,22.20
2014-06-03T14:40:00.00Z,22.00
2014-06-03T14:50:00.00Z,21.70
2014-06-03T15:00:00.00Z,21.20
2014-06-03T15:10:00.00Z,20.70
2014-06-03T15:20:00.00Z,20.20
2014-06-03T15:30:00.00Z,19.60
2014-06-03T15:40:00.00Z,19.20
2014-06-03T15:50:00.00Z,18.20
2014-06-03T16:00:00.00Z,18.00
2014-06-03T16:10:00.00Z,17.20
Save the file as “T_LUGANO_20140603161000000.dat” on the Desktop. The filename convention being used is: PROCEDURENAME_YYYYMMDDhhmmssfff.dat
Open a terminal by selecting Accessories ‣ LXTerminal.
In the terminal, enter: “cd /usr/share/istsos/” and press ENTER
Write “python scripts/csv2istsos.py -p T_LUGANO -u http://localhost/istsos -s demo -w ~/Desktop” and press ENTER
You should see a message “Insert observation success: True”
Click Geospatial ‣ Webservices ‣ istSOS.
Click the ENTER button in the administration page
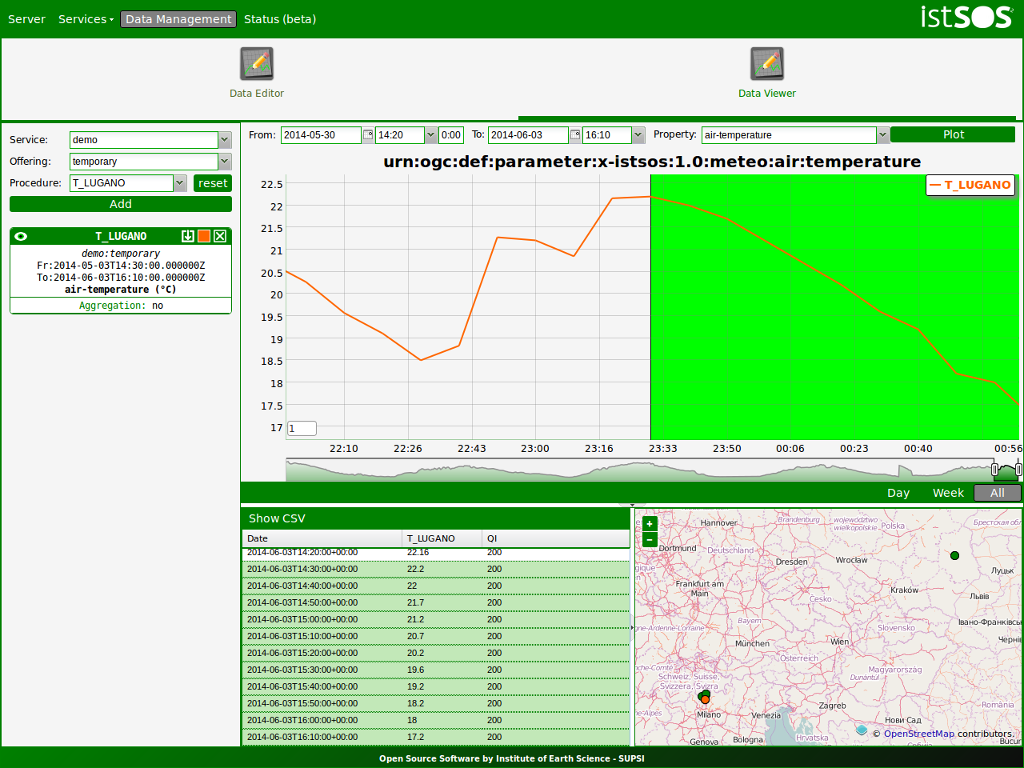
Click Data Management ‣ Data Viewer.
- Select the following:
- Service = demo
- Offering = temporary
- Procedure T_LUGANO
Click the Add button
Click the Plot button and check that the data have been added (watch out at your time zone!)
Click Geospatial ‣ Webservices ‣ istSOS.
Click Data Management ‣ Data Viewer.
Select the following: Service = demo, Offering = temporary
Select and add the following procedures: BELLINZONA, LOCARNO and T_LUGANO
On the right panel choose the Property: airtemperature
Press “Plot”, the last week of measurements is loaded and displayed
On the left panel select the “Editor” tab
Select T_LUGANO from the combo list
press “Start editing”, the grid is now displayed
At the bottomright corner of the chart there are 3 buttons “Day”, “Week” and “All”:
- Click on “Day”, the chart is zoomed to contain only one day of data
- Drag the timeline bar on the right where you will see that T_LUGANO has no data
Click on the chart to select the last observation before the “nodata” hole, a green line is displayed and in the Editing Grid the corresponding row is selected.
Now go to the ”Editing Grid” panel
- Click the first row where data are NaN,
- Scroll to the last NaN record and holding the SHIFT Key click on it
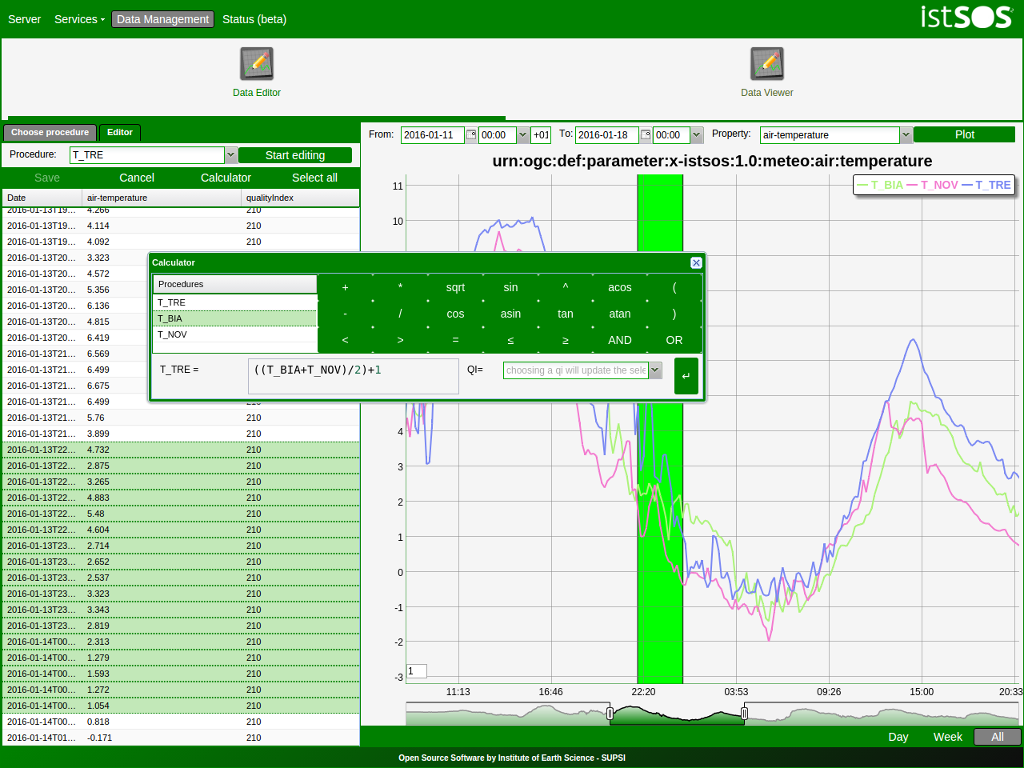
- The press the “Calculator” button
WIth the Calculator we are able to correct an interval of data in a single action. It is possible to set a numeric value or also use a function using data from the other loaded procedures. Let’s build a function that make the average of the data from BELLINZONA and LOCARNO and then removes two degrees:
((BELLINZONA+LOCARNO)/2)-2